Overview
If you wish to switch over from your current SSO to Azure AD, please follow the steps outlined in this article.
NOTE: This documentation is a copy of the tutorial created by Microsoft in order to Integrate Jive with Azure Active Directory and has been added in this Project for reference purpose.
This was NOT created with assistance from Jive.
In this article, you learn how to integrate Jive with Azure Active Directory (Azure AD). Integrating Jive with Azure AD provides you with the following benefits:
- You can control in Azure AD who has access to Jive.
- You can enable your users to automatically get signed-on to Jive (Single Sign-On) with their Azure AD accounts.
- You can manage your accounts in one central location - the Azure portal.
If you want to know more information about SaaS app integration with Azure AD, see what is application access and single sign-on with Azure Active Directory.
Environment
Jive - Any Cloud Version
Prerequisites
To configure Azure AD integration with Jive, you need the following items:
- An Azure AD subscription
- A Jive single-sign-on enabled subscription
NOTE: To test the steps in this article, we do not recommend using a production environment. To test the steps in this tutorial, you should follow these recommendations:
- Do not use your production environment, unless it is necessary.
- If you do not have an Azure AD trial environment, you can get a one-month trial.
Process
Scenario Description
In this tutorial, you test Azure AD single sign-on in a test environment. The scenario outlined in this tutorial consists of two main building blocks:
Adding Jive from the Gallery
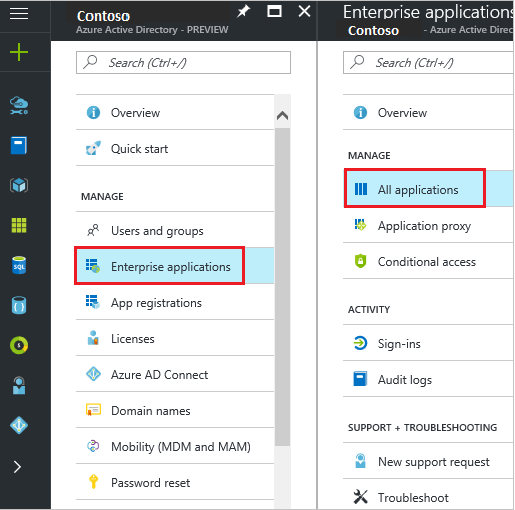
To configure the integration of Jive into Azure AD, you need to add Jive from the gallery to your list of managed SaaS apps. To add Jive from the gallery, perform the following steps:
- In the Azure portal, on the left navigation panel, click the Azure Active Directory icon.
- Navigate to Enterprise applications and go to All applications.
- To add a new application, click New application on the top of the dialog.
- In the search box, type
Jive.
- In the results pane, select Jive, and then click the Add button to add the application.
Configuring and Testing Azure AD Single Sign-on
In this section, you configure and test Azure AD single sign-on with Jive based on a test user called 'Britta Simon'.
For single sign-on to work, Azure AD needs to know what the counterpart user in Jive is to a user in Azure AD. In other words, a link relationship between an Azure AD user and the related user in Jive needs to be established. This link relationship is established by assigning the value of the user name in Azure AD as the value of the User name in Jive.
To configure and test Azure AD single sign-on with Jive, you need to complete the following building blocks:
(NOTE: We have linked each block to separate articles for ease of access and bookmarking when required.)
- Configuring Azure AD Single Sign-On - to enable your users to use this feature.
- Creating an Azure AD test user - to test Azure AD single sign-on with 'Britta Simon'.
- Creating a Jive test user - to have a counterpart of 'Britta Simon' in Jive that is linked to the Azure AD representation of the user.
- Assigning the Azure AD test user - to enable 'Britta Simon' to use Azure AD single sign-on.
- Testing Single Sign-On - to verify whether the configuration works.
Once 'Adding Jive from Gallery' and Configuring and Testing Azure AD Single Sign-on steps are completed, perform a Rolling Restart.


Priyanka Bhotika
Comments